

Once you have imported an audio file into Reason, you can transform it in many different ways. Here is a list of techniques you should try.
Reason: Working with Audio Clips
- Use the razor tool ('r' key) to break a long clip into many shorter ones. This works just like it does for note clips.
- Make a spare audio track for editing clips: Create > Create Audio Track. Then, using the arrow key, drag clips between tracks. Drag with the option (or alt) key down to copy clips.
- Drag the resize handles on either end of a clip to reveal more or less of the underlying sound file. As long as you still have at least one clip from a sound file, you can get the entire file back by resizing the clip. (Resize handles are labeled (1) in the second picture below.)
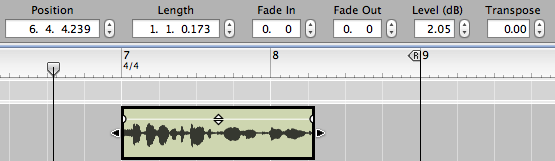
- If you select a clip, you can make precise changes to a
number of its characteristics by using the Inspector: its
position, length, fade in duration, fade out duration, level,
and transposition.
- The sound quality of transposition is affected by a particular audio clip setting. Select a clip in the sequencer, then choose one of the items from the Edit > Stretch and Transpose Type menu: Allround, Melody, or Vocal. Only the Vocal type will preserve the original formant frequencies after transposition. You can apply this setting at any time, even after having transposed a clip.
-
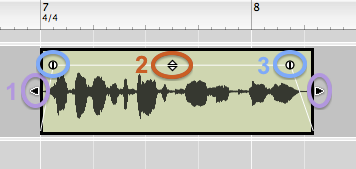
A selected clip shows a level handle, labeled (2) here, and fadein/fadeout handles, labeled (3).
The level handle adjusts the volume of the clip, without affecting other clips in the same track. Drag the level handle vertically.
If you listen carefully, you may hear clicks at the start or end of an audio clip. This can happen when you cut an audio waveform at a place where its amplitude is relatively high. This creates a discontinuity in the waveform that causes a click.
Get rid of clicks by applying a volume envelope to a clip. Even a very quick, barely noticeable attack or release can suppress a click. Use the fadein and fadeout handles to adjust the envelope of a clip. Drag these handles horizontally to adjust the fade durations.
This may strike you as an obscure consideration. But if you want professional results, you need to suppress undesirable clicks.
- If a clip seems too low in volume, you can normalize it: scale its amplitude so that the waveform fills the maximum dynamic range before clipping. To do this, choose Edit > Normalize Clips. Note that this also raises the volume of any noise in the clip (the “noise floor”).
- To make a clip play backwards, select the clip and choose the Edit > Reverse Clips menu command.
- Keep your work organized by labeling audio clips. For
example, you could label a clip with some of the words that
are sung or spoken in it. To do this, select a clip, choose
the Edit > Add Labels To Clips menu command, and
type in the edit box that appears. Then press the return key.
If you want to delete a label, select the clip and choose the Edit > Remove Labels From Clips menu command.
It can be helpful to assign different colors to your clips, using the Edit > Clip Color menu.