Dynamics Effects

Reason: Dynamics Effects

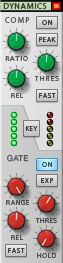
Dynamics effect processors act on the dynamic range of your music — the difference between the softest and loudest sounds. They reduce or increase this range. There are many musical applications of this type of effects processor, from eliminating clipping to transforming the sound of drum tracks. This lesson covers the basics of the limiter, compressor, and gate variants of dynamics processing, with reference to specific devices in Reason.

Types of Dynamics Processors

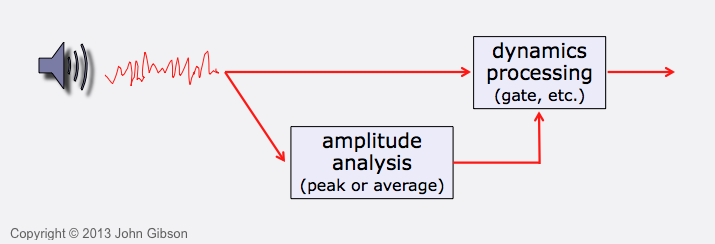
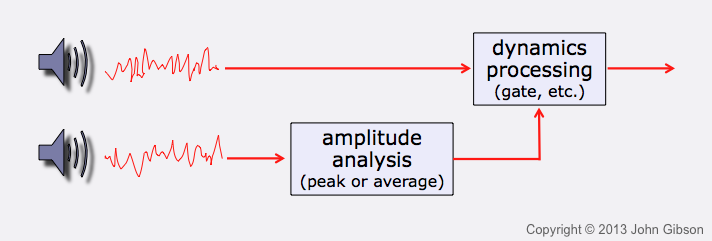
Dynamics processors automatically adjust volume on a moment-by-moment basis. They perform a real-time analysis of the dynamics (changes in volume) of the incoming audio signal, and use this, in conjunction with parameters you set, to guide the volume adjustments they make.

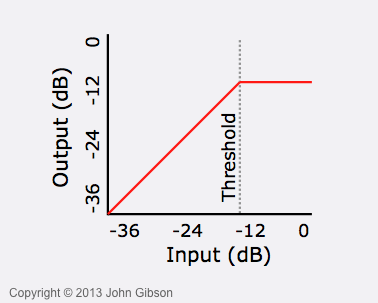
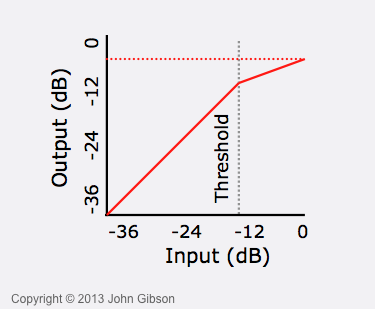
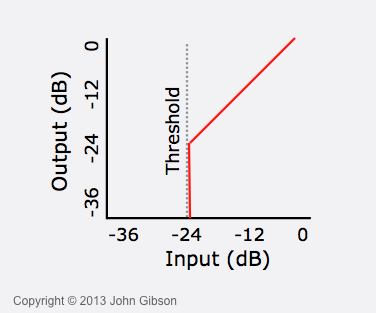
When the incoming volume crosses a threshold level, the processor adjusts the volume. The four types of dynamic processor do this in different ways.

Dynamics Effect Types
Effect type What it does
Limiter Limits volume to the threshold level
Compressor Scales down volume when it’s above threshold
Gate Mutes sound when volume is below threshold
Expander Scales down volume when it’s below theshold

The compressor and limiter both reduce dynamic range, while the gate and expander increase dynamic range.

Dynamics processors are used as insert effects, not as send effects, because you normally want the whole signal to be affected by them. You can apply the insert to an individual instrument or to the entire mix (in the master section of the Main Mixer).

The Loudness War

One of the purposes of compressors and limiters is to make tracks sound louder. If you reduce the dynamic range, then you can turn up the volume of everything without causing clipping. The tendency of recent recording artists and producers to demand louder tracks has given rise to the phrase, “loudness war.” You can see this at work by comparing recordings from different eras.

Here is one channel of a recording of Joni Mitchell’s performance of “The Dry Cleaner from Des Moines,” from her 1979 album, Mingus. This is the first minute of the song.

Waveform for Joni Mitchell song, showing low average level with occasional peaks

Compare this with Radiohead’s “Everything in Its Right Place,” from their 2000 album, Kid A (also the first minute).

Waveform for Radiohead song showing high average level

You don’t even have to hear these to guess that the Radiohead track sounds a lot louder than the Joni Mitchell recording. It’s not simply that the Radiohead waveform reaches the minimum and maximum amplitude limits (because the Mitchell recording comes close near the end of this excerpt). It’s that the average power of the waveforms are markedly different: a difference of over 12 dB, which is more than twice as loud. And the power of the Mitchell waveform fluctuates over a range of about 12 dB, as compared with only about 3 dB for the Radiohead waveform.

Radiohead no doubt did this to envelop the listener in powerful sound, but more radio-friendly groups seem to be in competition with one another merely to create the loudest track. The thing to remember is that dynamic range is an important part of music, and compressing it too much might sacrifice valuable qualities in your music.

The Limiter

The limiter is designed to prevent an audio signal from exceeding a specified amplitude level. We can visualize its operation using a transfer function graph, shown in the figure below. This shows input to the limiter arriving along the X axis and output leaving along the Y axis. Both axes indicate the amplitude of sound, in negative dB below 0 dB, the maximum encodable amplitude in a digital system. If a transfer function graph were to show a diagonal line extending from the lower left corner to the upper right corner, this would mean that the limiter is doing nothing to the sound. If the input sound is at -12 dB, it will go out at -12 dB. Anything other than a diagonal line represents a change in volume that the limiter is making. Some dynamics effects have a transfer function display that lets you edit the graph, but none of the effects in Reason have this.

The threshold for a limiter indicates the maximum output level that you would like. If the input level exceeds this threshold, the limiter clamps the output amplitudes to that level. The graph below shows that any sound below the -12 dB threshold is unaffected, whereas levels above the threshold will be held to -12 dB by the limiter.

Transfer function graph for limiter with -12 dB threshold

Reason has the MClass Maximizer, an easy-to-use limiter. This can function as a brickwall limiter, which guarantees that the output will not clip. This feature makes it useful as an insert on the Master Section device near the top of the rack, which applies the limiter to the entire mix.

Reason Maximizer with brickwall limiter settings

Here is what you need to do to create a brickwall limiter with the Maximizer.

  • Turn on the 4ms LOOK AHEAD button. Look ahead is a common feature of limiters that causes the limiter to delay the output signal by a small amount of time (four milliseconds in this case) in order to look ahead in the input signal for amplitude peaks to limit. This allows the limiter to reduce the volume of the signal gracefully just before the peak arrives.
  • Turn on the FAST attack time button.

If you want, you can then increase the INPUT GAIN control to make the music louder. It will not clip.

Notice the vertical gain reduction meter that is just to the right of the look ahead setting. This lights up to indicate how much gain reduction the limiter is applying to the signal. It lets you know whether the limiter is working, and whether you might be doing a little too much limiting.

Notice that this limiter has no threshold control. Reason sets this internally based on your input gain amount. This makes the processor easier to use.

Just because you can make your mix peak at 0 dB doesn’t mean you should do that! For one thing, an AAC (or MP3) encoder can sometimes cause its output to clip if the input is at or very close to the maximum amplitude. It’s best to leave at least 1.5 dB of headroom (extra room below the maximum amplitude) to allow for this possibility. The problem is worse with lower bit-rate MP3s, such as 128 kbs. You can achieve extra headroom after setting up your limiter simply by lowering the master volume control by 1.5 dB.

The Compressor

A compressor functions almost like a limiter, but it is capable of attenuating (reducing the level of) the signal in a more gentle way. It does this by including a ratio control, with typical values of 2:1, 4:1, 8:1, etc. A 2:1 ratio means that for every 2 dB increase of input level, the compressor allows a 1 dB increase in output level. The transfer function graph below shows a compressor with a 2:1 ratio: as the input rises 12 dB, from -12 to 0 dB, the output rises only 6 dB, from -12 to -6 dB.

Transfer function graph for compressor with -12 dB threshold and 2:1 ratio

A compressor with an infinity-to-one ratio is the same as a limiter, with the same horizontal line segment on the transfer function graph.

When not functioning as a limiter, a compressor can act transparently to even out changes in volume that might make it harder for a vocal or melodic line to stand out in a mix. The compressor also can be used to emphasize quieter sounds, such as vocal breath intake, that otherwise might be lost. This is important to singers, such as Bjork, who sometimes want to achieve an intimate sound quality. Drum tracks of all sorts can be transformed using compressors, to make them more punchy or to give them an artificial pumping quality.

Reason has a compressor built into every channel strip of the Main Mixer, but it also has the dedicated MClass Compressor, shown below.

Reason MClass Compressor showing significant gain reduction on Gain meter

This has the input gain, threshold, and ratio controls, and the gain reduction meter, already discussed. It also includes two envelope controls: attack and release times. Most dynamics processors include these envelope controls. They affect the behavior of the processor when input rises above or falls below the threshold. For the compressor, it works like this:

  • When the input rises above the threshold, the compressor gradually reaches maximum attenuation (specified by the compression ratio) over the course of the attack time.
  • When the input falls below the threshold, the compressor gradually returns to no attenuation over the course of the release time.

As a simple example, if you compress a snare drum track, you can set the attack time to be a little bit longer. Then the crack of the snare drum hit will get through the compressor before it has a chance to attenuate the signal. This lets you preserve the transient drum attack while reducing the dynamic range of the rest of the sound. If you want transients (very brief loud sounds) to be compressed, you need to use a fast attack time, as we did when setting up the brickwall limiter earlier.

The Gate

A gate lets through only the sound that is above the threshold level.

Transfer function graph for gate with -24 dB threshold

This transfer function graph indicates that any sound entering at a level above the -24 dB threshold will come out at that same level, whereas any sound below the threshold will not pass through the gate. (This would be more clear if the full amplitude range, from negative infinity to 0 dB, were visible on both axes.)

One common use of a gate is as a noise gate for guitars and vocals. This is a simple way to remove undesirable hum and noise from the signal in between times that the musician is playing or singing. Set the threshold so that the gate stops the hum and noise but lets through the musical notes.

Gates can also be used more creatively, to transform the sound of drum or rhythm guitar tracks, for example.

Reason gate settings in Main Mixer dynamics section for a channel strip

Every channel strip in Reason’s Main Mixer includes a gate, as well as a compressor. The gate is in the lower part of the Dynamics section, with the darker gray background.

Turn the gate button ON, set the RANGE control all the way to the right, and adjust the threshold (THRES) control as needed. The gain reduction meter, shown in bright green, lights up when the gate is closed. Consult the Reason manual for details about the other controls here (in The Main Mixer > The channel strip > Dynamics section > Gate/Expander).

Sidechain Processing

Any dynamics processor couples an amplitude analysis stage to a processing stage. The effect first tracks the amplitude changes of the input, and then applies gain reduction to the input, in accordance with the threshold, ratio, and other controls.

Signal flow for a standard dynamics processor, with same audio source feeding both amplitude analysis and dynamics processing stages

But the signal that is analyzed does not have to be the same as the signal that is processed. In this configuration, the signal to be analyzed is known as the sidechain, or key input.

Signal flow for a sidechain dynamics processor, with separate audio source subjected to amplitude analysis

Here are some applications of sidechain dynamics.

  • You can trigger a sustained sound (for example, piano chords or a synthesizer melody) from transients played in a drum track. Put a gate on the sustained track, and set its key input to the drum track. The sustained sound will turn on whenever there is a drum hit; otherwise, it will be suppressed, creating rhythmically precise gapping, synchronized to the drum track.
  • Send the kick drum signal to the sidechain of a compressor affecting an electric bass. When a kick drum hit rises above the threshold, the compressor will reduce the volume of the electric bass. This lets the kick drum speak more clearly and reduces the chance that the combination, along with other tracks, will cause clipping. When applied to the entire mix, instead of just the bass, this creates a throbbing effect that is common in some kinds of electronic dance music.
  • A ducker analyzes the level of an announcer’s voice and uses that to reduce the level of background music when she’s speaking.
  • A de-esser removes sibilants (i.e., “ess” sounds) from vocals. Route the vocal through a peaking EQ with a center frequency of 5-10 kHz, which emphasizes the sibilance, then into the compressor sidechain. The compressor will attenuate the unfiltered vocal when the high frequency sibilance is too strong.

Parallel Compression

NOTE: None of the material below will appear on a quiz.

Some people think that compressing a drum track (or some other track that includes many transients) is the wrong way to reduce dynamic range, because it can damage the transients that make the drums sound crisp and clear. Another approach is to reduce dynamic range by raising the low part of the range, instead of reducing the high part of the range. This is sometimes called upward compression. If you do this, you’ll still hear the high-amplitude transients well, but you’ll also hear the more subtle, softer sounds (for example, snare ghost notes and light hi-hat strikes), which the upward compression raises in volume.

The trouble is, very few dynamics processors implement upward compression — certainly none of the ones in Reason. But the good news is that you can perform upward compression using two copies of a track running in parallel, with a normal downward compressor running on one of the tracks. Reason makes this a little easier to set up by providing a way to make a parallel channel for your source track without having to duplicate the source track. Just right-click on the track name in the Mixer, and choose Create Parallel Channel. Another mixer channel appears with the “P1:” prefix.

Try this with a Dr. OctoRex using the default drum pattern. Your goal is to increase the hi-hat eighth-note volume without increasing the level of the snare and kick transients.

Enable the compressor built into the mixer on one of the parallel channels, set its ratio very high (50:1 or higher), and set its envelope to respond quickly to the transients. For this compressor, press the FAST button, and maybe also the PEAK button. Adjust the REL knob (release time) to a fairly low level, which will allow the compressor to open up quickly after a snare/kick hit, letting the intervening hi-hat notes through. Solo the track, and notice that the hi-hat is louder than before, relative to the now reduced snare and kick hits. Leave solo mode. The other channel restores the kick and snare, and you can still hear the hi-hat better.

What’s happening is that the part of the sound that is below the compressor threshold (the hi-hat) is not affected by the compressor. By playing two copies of that sound, you’re effectively doubling its amplitude for an increase of 6 dB. The part of the sound above the threshold (kick/snare) is reduced drastically by the compressor, so the combination of channels does not boost it by much.

Additional Reading

This Sound on Sound article on parallel compression contains some diagrams that can be very helpful for understanding what compression does in general. It also has a very good, in-depth treatment of parallel compression.