

Assignment 2: Editing
In this assignment, you’ll create some phrases using the
sounds you recorded in Assignment 1.
Goals
- Develop at least two contrasting phrase ideas by combining the sounds you recorded in Assignment 1.
- Get familiar with dropping audio files into tracks, in the DAW of your choice, and chopping up the resulting audio clips.
- Use fades, volume automation, and panning to shape the dynamics of your audio clips.
- Use insert effects to create transformations of your sounds.
Musical Background
You made recordings of sounds that are not explicitly musical. In other words, the objects whose sound you recorded were probably not designed to make sound that someone might use in music.
Our goal here is to arrange the sounds in time so that they participate in a musical continuity. This requires you to think about the musical potential of your sound material and about how the sounds might relate to one another, either by similarity or contrast.
Be sensitive to the differences between your sounds. For example, you were asked to record a sound with a fast attack and other sounds with a more gentle envelope and more constant sound level. Take advantage of these differences when finding creative ways to process and combine sounds. Perhaps some sounds will lead more effectively into other sounds, for example.
Software Availability
The MC304 computer has three Digital Audio Workstation (DAW) programs: Digital Performer, Logic, and Reaper. You may use them on that computer, of course, but you may also want to have the program you choose to work with available on your own computer. Of these three, Digital Performer is the most expensive ($395), followed by Logic ($199) and Reaper ($60). Other possibilities, which you may already have and know how to use, include Pro Tools ($99 / year), Ableton Live ($450), Cubase ($332), and FL Studio ($199). Pro Tools is an industry standard, but the copy protection mechanism is troublesome, unless you’re used to dealing with such things.
We plan to provide a way for you to bring your own laptop into the studio and plug into the mixer, so that you can monitor your work in another DAW on the studio’s speaker system.
Technical Background
DAWs may look dissimilar, but they all feature non-destructive audio editing across multiple tracks, volume fading at the edges of audio clips, parameter automation (for volume, pan, and effects), and audio effects plug-ins. If you understand the basic concepts, you can move from one program to another with a period of adjustment.
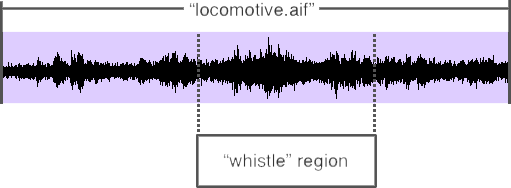
In DAWs, you work with the audio in a sound file using regions (Logic Pro, ProTools), clips (Ableton Live, Reason), or soundbites (Digital Performer). These terms mean the same thing, so let’s use region here. A region is a reference to a portion of a sound file on disk. For example, say you have a sound file called “locomotive.aif.” It’s a 30-second recording of a steam engine, which blasts its whistle for 10 seconds during the middle of the recording. You could make a region, called “whistle,” that refers just to the portion of “locomotive.aif” during which you hear the whistle.
The region stores the start time of the whistle, relative to the beginning of the sound file, and the duration of the whistle. When a DAW program plays this region, it looks up the timing information in the region, and then uses it to read just the specified portion of the sound file.
Here’s the important part: the region does not contain a copy of the portion of the sound file. It just contains two references — start time and end time — to the sample data in that file. This means that the region doesn’t take up very much memory or disk space — nowhere near the amount used by the audio data. It also means that editing regions is very fast, because only the start-time and end-time references must change, not the actual audio data in the sound file. Regions are the cornerstone of a DAW’s non-destructive editing environment: they make it possible for you to cut and paste bits of audio without ever altering the original sound file.
Process
- Make a new project in your DAW of choice. Set the sampling rate to 48 kHz. (If you have an audio interface, set its sampling rate to 48 kHz also. This should happen automatically when you choose 48 kHz in your DAW, but not always.)
- Import your sound files into your DAW project. Often this is
as simple as dragging them from the Desktop into the place in
your DAW where tracks are, or would be.
It can work well to move all of the sounds into a single track at the top. Treat this as a reservoir of sound material, not meant to play along with your other tracks. Mute this track when not listening to it as a catalog of your source material.
- Extract segments of audio from your reservoir track, and move these into tracks below.
- Create sequences of events using your edited audio regions.
You can do this within a single track, treating the audio
regions monophonically (in a single voice, one region after
the other) or within multiple tracks, treating the regions
polyphonically to create simultaneous layers of sound.
You might find it helpful to conceive of your activity as composing a phrase for non-pitched percussion.
- Learn how to make fades in the DAW you chose. They will let you suppress any clicks or pops at the edges of your edited regions. Some DAWs have an option to do this automatically, perhaps even by default. Fades can also be used to create cross-fades, or smooth overlaps, between successive regions that are exactly abutted.
- Set up additional tracks with some insert effects,
such as reverb. This gives you the option of quickly moving
an audio region from a dry track (without effect) to one that
creates a noticeable sound change using an effect.
Some audio effects are designed to enhance the qualities of the sound you already have (EQ, compression, reverb). Others can be more transformative, such as many in the GRM Tools collections and in Absynth FX, 3rd-party plug-ins that are available on the MC304 computer for all the DAWs running on that computer.
You can find many good free plug-ins online. A few possibilities:
- Michael Norris: Soundmagic Spectral (AU, Mac only)
- SoundHack plugins (AU, VST, AAX)
- Melda Production: MFreeFXBundle (AU, VST, VST3)
- Voxengo (AU, VST, AAX)
- DAWs also have ways to constructively process sounds, meaning that this form of processing creates new sound files. This is best reserved for kinds of manipulation that cannot be done sensibly in real time, such as reversing or time-scaling a sound.
- If you find yourself needing more variety in the treatment
of your sounds, you can try doing two things in Audacity:
varispeed transposition one or more octaves lower
and extreme time-stretching.
- Launch Audacity. (If it tries to scan all your plug-ins for compatibility, just press the Skip button repeatedly until it stops asking. You likely won’t need to use plug-ins in Audacity. Save those for use in your DAW.)
- Drag your sound file into an empty Audacity track.
- Select the portion of the sound you want to change.
- Choose Effect > Pitch and Tempo > Change Speed.
- Set Speed Multiplier to a number less than 1.0 before pressing the Apply button.
- Or choose Paulstretch from the same menu, and try the default Stretch Factor of 10.0 (and press Apply).
- If you don’t like the result, use the Undo command (Edit menu).
- To get your changed sound out of Audacity, use File > Export > Export as WAV, and set the Encoding to Signed 24-bit PCM.
- Import the sound into your DAW project.
Change Speed lowers the pitch at the same time that it stretches the duration. Paulstretch keeps the pitch constant while stretching the duration. The resulting extreme stretch sound can be a computer music cliché, but just like Mozart’s trill cadential figures, they can still be musically effective if placed well.
Varispeed transposition of identifiable voices and instruments can be unsatisfying or gimmicky for reasons that we’ll discuss later, but some sounds work well with this treatment.
You can create both of your phrases in the same project, using a different set of tracks, with the sound of each phrase being successive rather than simultaneous. Or, you can use a separate project for each phrase.
Bouncing
Learn how to bounce your project(s) to a single stereo sound file. Be sure to use 48kHz sampling rate, and for now use 16-bit resolution, just to reduce Internet transfer times. Either WAV or AIFF format is fine.
There are two common mistakes people make when bouncing:
- selecting the wrong tracks and ending up with no sound in the sound file, and
- selecting lots of time after the sound stops and ending up with a long sound file, much of which is empty.
Submission
Please submit in Canvas one or more sound files that satisfy the criteria above. Be prepared to show your DAW session in tutorial, if at all possible, but do not submit this in Canvas.
Grading Criteria
This assignment will receive a letter grade based on the following criteria. The highest grade is A. There will be a one grade-increment deduction (e.g., from A to A-) for each of the following problems, except for the first, which counts two increments.
- Make at least two phrases having effective musical qualities. [2 increments]
- Avoid clicks and pops in your edits using fades.
- Try some insert effects to create contrast between instances of particular sounds.
- Hand in one or more sound files in the requested format
that play correctly.
Your files should not be very long, so you should be able to upload them to Canvas. If you have trouble, please be aware of the file sizes you’re working with.
Manuals
PDF manuals for Digital Performer, Logic Pro, and Reaper are available from the Help menu in each program. There is also an online manual for Logic Pro. Pay particular attention to the section of the manual called “Edit audio regions in the Audio Track Editor.”
Logic also has the excellent Quick Help facility, which puts up tips wherever you aim your cursor. Turn this on and off with the question mark icon in the upper left corner of the window.
YouTube is a great place to find how-to videos, but be aware of which version of the program the video is about. These tutorials usually are aimed at people making pop music, but they are still useful for our purposes. Videos worth watching include: