Recording

Recording in the CECM Studio

These instructions tell you how to set up a condenser microphone and use it to record into the computer, via our mixer.

Process

There are several steps involved in making a good recording in our studio.

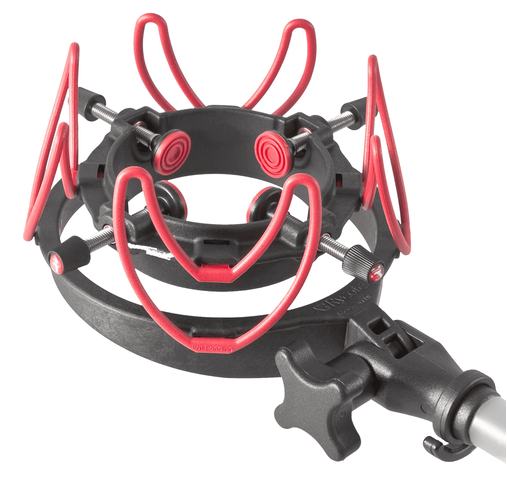
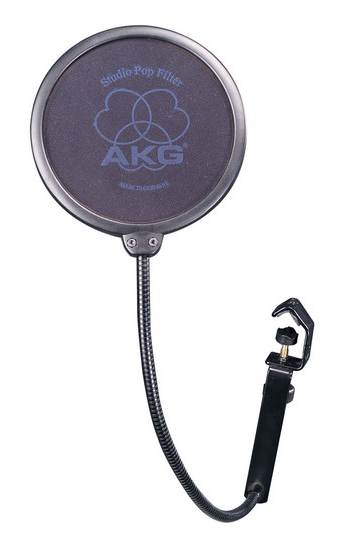
  • Set up one AKG C414 microphone, and connect it to the mixer.
  • Set the mixer controls so that you get an optimum sound level from the mic — not too soft, not too loud — coming into the mixer.
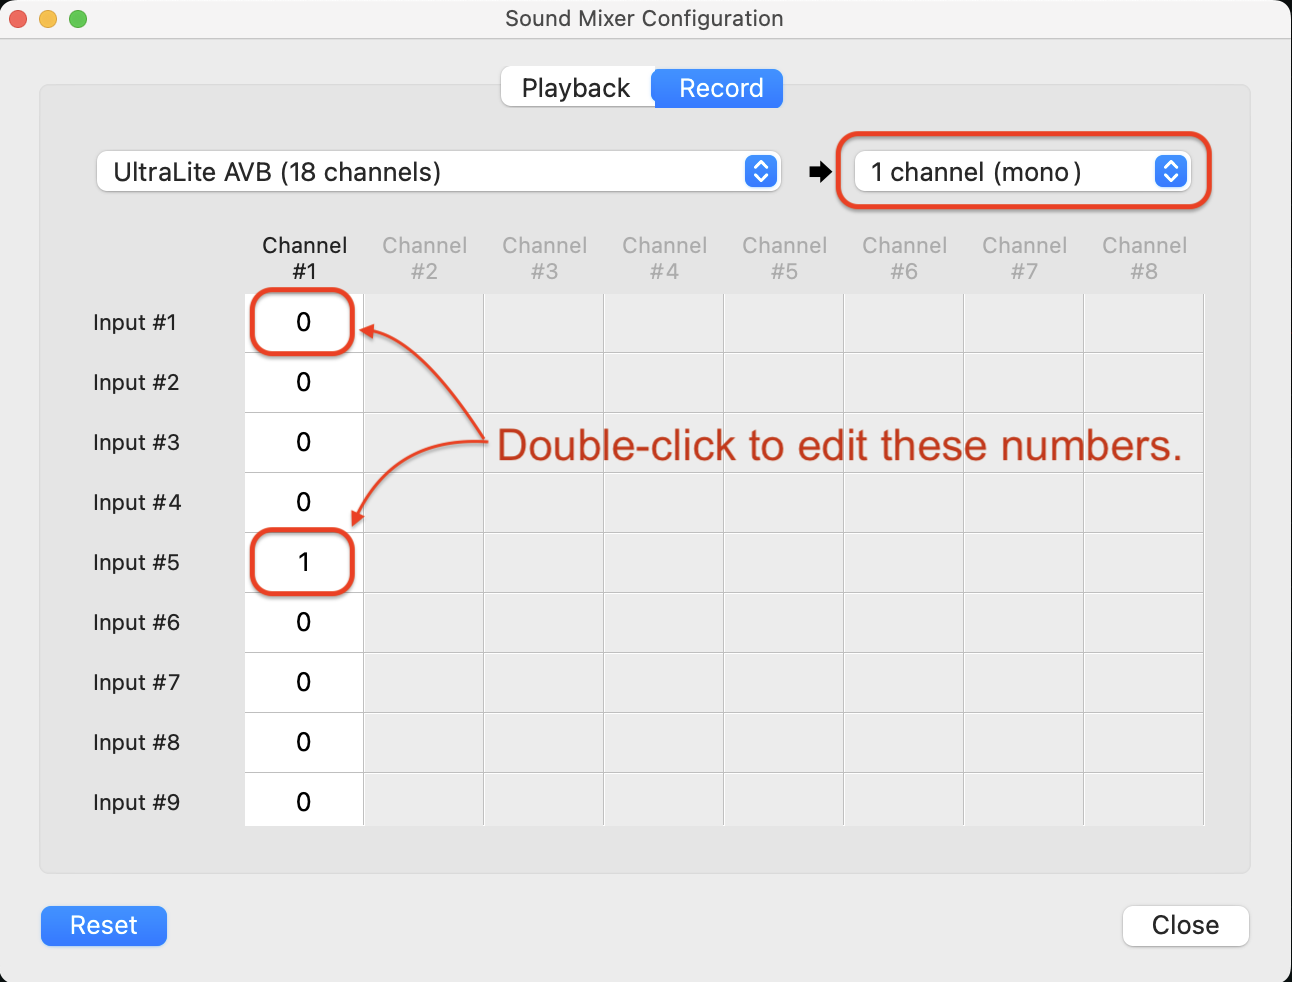
  • Set the mixer controls to route the microphone signal into the computer for recording.
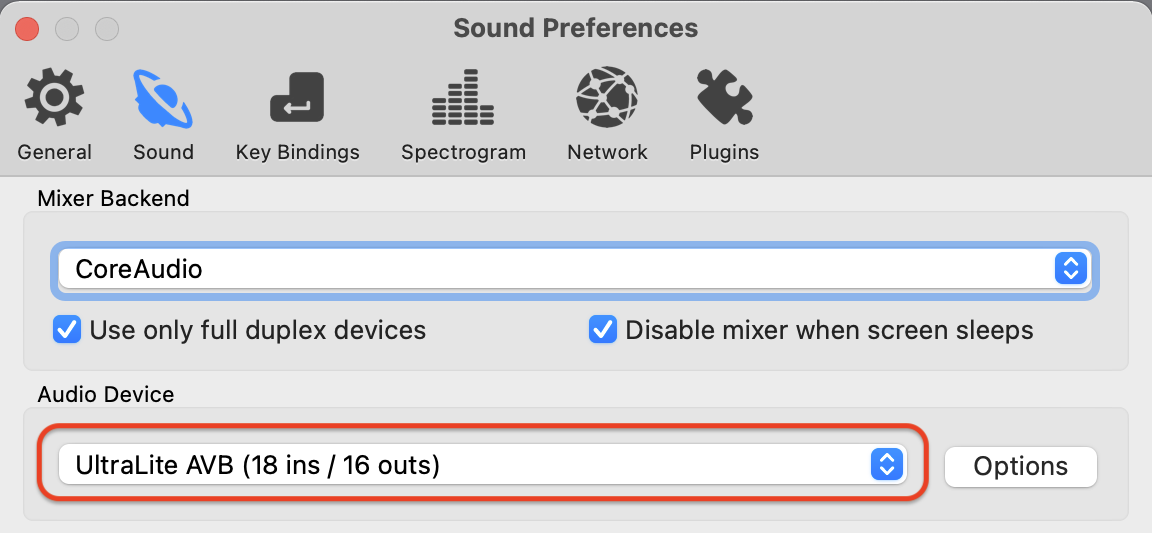
  • Prepare for recording in ocenaudio, and adjust sound level coming into the program.
  • Record and save your sound.
  • Listen critically to your sound, and repeat the process as needed.

The more recordings you make, the better you will get at this process.

Details

Here are detailed steps you should take to start your studio session and record into the computer.

Preparation

  1. Our policy is to keep the power on all the time. However, sometime you may find the studio power or just the computer off, so you should know how to power these on.
  2. Look at the Furman power conditioner in the rack. If there’s a light blinking above “Delay 1,” then you will need to turn the studio power on by pressing the gray button on the power conditioner. The equipment will come on in a preset sequence, with delays. The computer does not turn on automatically. Power it on by pressing the power button, which is on the back of the computer, at the lower left side.
  3. Zero out the mixer, if it hasn’t already been done: working up from the bottom of the mixer, pull all the faders down; leave the pan knobs set as they are (odd channels panned hard left, even channels panned hard right); set all EQ to center detents; set all Aux knobs to their leftmost position; set all Gain (i.e., trim) knobs to their leftmost position. Make sure all buttons are up.

    This is to give you a “clean slate” before beginning your session.

Setting up the Microphone

  1. Set up one AKG C414 microphone on the mono mic stand:
    • The mics and cables are in the top drawer of the left filing cabinet that’s under the desk next to the door. Place the mic stand close enough to the mixer so that you can operate the mixer controls while speaking or otherwise making noise into the mic.
    • The mic stand should have a shock mount attached to it. This has red plastic wings. The mount should screw into the end of the mic stand. Leave the wings facing up, as in this picture.

      A Rycote shock mount attached to a boom arm

    • Unscrew the set screws of the microphone shockmount a few turns so as to leave enough room to insert the microphone barrel. Bring the female XLR end of the mic cable up through the shockmount and, while holding the mic above the shockmount, plug the mic cable into the bottom of the mic. It should click, though it is a tight connection, so it may not happen.

      Just a reminder: the silver screen is the front of the mic, and is the part you would talk or sing into; the black screen is the back.

    • Now lower the mic into the shockmount. Tighten the set screws so that the shockmount holds the mic securely.

    • Plug the male end of the cable into input channel 1 on the mixer. The XLR jacks are on the top of the mixer.
    • Turn on the mixer’s phantom power switch. (It’s next to the mixer’s power switch. Press the bottom part of the rocker switch to turn it on — to the position marked with a dash.)
    • When you are recording vocal sounds, including speech, you should use a pop filter to prevent plosives and breath from moving the microphone diaphram around too much. Normally, you don’t use the pop filter when not recording vocals.

      An AKG pop filter

  2. Set the microphone switches appropriately.
    • Pattern — choose between cardioid, hyper-cardioid, omni, and figure-eight. Usually, you’ll want cardioid.
    • Pad — set to 0 dB for speech and softer instruments, -10 or -20 dB for trumpet, percussion, screaming, etc. Without doing this, you might make a recording that sounds distorted, even though the meters on the mixer and computer do not show clipping.
    • Bass roll-off switch — Set to 70 Hz or 100 Hz to reduce mic stand vibrations, popping from voice, etc. The only time you will turn this off is if you’re recording low sounds: anything that has a pitch below the G string on the cello (c. 100 Hz).

Setting up the Mixer

  1. Set the mixer controls so that you get an optimum sound level coming into the mixer.
    • Set the microphone channel fader to unity (0 dB).
    • Speak or play an instrument (whatever it is you want to record) into the mic.
    • Adjust the GAIN control so that you see a little flickering on the green light above the channel fader, but you never see a red light. For speech, the GAIN knob will probably be at about 2 o’clock; for trumpet, maybe 12 o’clock.

      NOTE: Turning the gain knob all the way up to amplify soft sounds is counterproductive, because the top range of the mixer’s mic preamp is noisy. Better to keep it < 4 o’clock, and be sure to record in 24-bit resolution.

  2. Set the mixer controls so that the mic signal is routed into the computer for recording.
    • On input channel 1, where you connected the mic, keep the fader at unity gain, and engage (i.e., press down) the 1-2 button. This routes that input channel to the 1-2 bus outs (or sub outs, or group outs) in the mixer’s output section. You will notice that those are labled Analog In 1-2. This means that the sound goes to those input channels on the MOTU Ultralite AVB audio interface in the rack. (Strangely, these are known as channels 5-6 in some programs, such as ocenaudio and Logic Pro.)
    • Note that the pan knob on input channel 1 should be all the way to the left. (This sends that the mic only into bus out 1.)
    • In the output section, raise the bus out 1 fader to unity gain.
    • In the SOURCE section, engage the 1-2 button. This meters the signal arriving at the 1-2 bus outs. (To listen to the sound with headphones, raise the CTLROOM/PHONES knob.)
    • Make sure the L/R fader at the far right, controlling the level of sound for the front speakers, is all the way down! Otherwise, you could generate painful feedback!

      This happens because the sound coming out of the speakers enters the microphone, which comes out of the speakers, which enters the microphone, etc., at each stage reinforcing the amplitude of the signal.

      Always make sure the speakers are off while recording!

    • Make some noise into the mic, to make sure you see level in the meters.

Recording

  1. Record your first sound in ocenaudio.
    • In the Mac’s Dock, click the ocenaudio icon to launch the program.
    • The first time you run ocenaudio, check that the audio driver is set correctly for the MOTU Ultralite AVB interface we use in our studio.
      1. Choose Preferences from the ocenaudio menu, and click the Sound icon. The first popup menu should read CoreAudio. Set the Playback and Record devices to the Ultralite.

        Screenshot of the Ocenaudio Sound Preferences window with Audio Device popup menu showing our Ultralite AVB audio interface

      2. Choose Record Mixer Config from the Controls menu. Put a 1 in the first column at the Input #5 row and a 0 at the Input #1 row.

        Screenshot of the Ocenaudio Sound Mixer Configuration window with input column edit fields indicated

      3. Quit ocenaudio and relaunch it. This appears to be necessary sometimes to make these configuration changes stick.
    • Click the red circular record button in the transport area, or press the 'r' key.

      Screenshot of the Ocenaudio transport toolbar with record button circled

      A dialog box appears, requesting that you choose the sample rate, the number of channels, and the resolution. Choose 48000 Hz, Mono, and 24 bits.

      After you press OK, recording begins immediately.

    • Make some noise into the mic. While ocenaudio records, watch the levels on the meter in ocenaudio, and set your recording level. To control the level of signal reaching the computer, use the bus out 1 fader (labeled MOTU IN 1) on the mixer.

      Aim for peaks no higher than about 0.70 in ocenaudio. It’s okay if your peaks are rarely above 0.25. If they are much less than this, your level is too low. Or you’re recording a sound that is inherently soft, such as whispering or pins dropping. These guidelines are just rough rules of thumb.

      By the way, it’s better to see the amplitude scale expressed in decibels (dB). To do that, choose the View > Vertical Scale Format > Decibels menu command. 0.70 becomes -3 dB, and 0.25 becomes -12 dB.

    • Once you have a good level, stop recording. (Press the space bar.)

      Choose File > Undo Record to remove the recorded material.

    • Press the record button again to record for real this time.
    • Save your file now (using File > Save), but don’t play your sound yet! When saving, you can accept the Wav PCM Linear default format. There are many other formats in this popup menu, but only a few of them are uncompressed formats, which is normally the only thing you should use for recording. AIFF (or AIFFC) is the other main one.
  2. Listen to your recording.
    • On the mixer, make sure you have the mic channel muted (MUTE button) while playing back your sounds!

      This is to prevent feedback between the mic and speakers. (Do you see how this can happen?)

    • The sound will come from the computer via the MOTU Analog 1-2 mixer channels, which are channels 9 and 10. Raise both faders to unity.
    • On those input channels, engage the L/R buttons to assign the signal to the main mix (i.e., “Speakers L/R”).
    • In the mixer’s output section, raise the “Speakers L/R” fader at the far right.
    • Play back your sound in ocenaudio. (Press the space bar.)
    • Before you resume recording, turn the speaker fader down all the way, and unmute the mic.
  3. Record more sounds.

    To record into a new file, choose File > New.

Ending your Session

  1. Tidy up! At the end of your session...
    • Turn off phantom power, wait a few seconds for the power to wane, then disconnect the mic(s) from the mixer.
    • Coil cables neatly, binding them with the Velcro strip, and return everything to the file drawer (cables on top of the mic box, not below it).

      Practice coiling cables, using this video as a guide. This other video goes into more detail and presents a slightly different method.

    • Zero out the mixer.
    • Log out of the computer, but do not power it down. Do not power the rest of the studio down either.

Manuals

Manuals for the Mackie 1604 VLZ mixer and AKG 414 microphones are in the Manuals folder on your Desktop.