Assignment 3, Part 3

Sampling

A sampler plays back a recording whenever you play a note. Whatever you’re able to record can be fed into a sampler, whether it’s a flute note, a drum hit, or Homer Simpson shouting “Doh!” Since we have no recording equipment available for this class, you’ll probably be relying on recordings made by other people. Many such recordings are available on the Internet, free for use. Others are not free for use. If you incorporate sound made by others into your own music, and then you distribute your music — this includes putting an MP3 on your web site — you need to respect the copyrights of the people who recorded the sound. (Otherwise, lawyers may chase you.)

We refer to a recording (a sound file) that you put into a sampler as a sample. Once you load a sample into a sampler, you can map the sample to a range of keys (or just a single key) on the keyboard. That way you can have many different samples spread across the keyboard. This is useful for drum kits, where different keys play different drums. It’s also the way to make multi-sampled instrument patches, such as a piano.

Let’s say you have a sample of middle C on a piano. If you play middle C, then of course you hear a middle C. But if you play the D above that, the sampler transposes the sample so that you hear a D. The problem is that if you transpose a sample too far from its original pitch, it sounds artificial. So sampler patches that try to reproduce the sound of a real instrument map one sample to a small range of keys surrounding its original pitch. On the best sampled pianos, a single sample might cover only one or two notes. Making a good multi-sampled instrument patch is very difficult and beyond the scope of this course.

Reason has two samplers, the NN-19 and NN-XT. The NN-19 is the simpler one, and that’s what we’ll use in this assignment. What we’ll do is find two sound files and, if necessary, trim them using a sound editor. Then we’ll make a sampler patch that maps one of the samples to one half of the keyboard and the other sample to the other half.

Find Some Sounds

  1. Search for sounds at the following web sites (and any other sites you discover).

    These sites all work differently, but in general, when you click on a sound, it will open a QuickTime player window that lets you play the sound. If you want to download the sound, you have to do something else. In Safari, right-click (click with the right mouse button) on the sound link, and choose Download Linked File from the menu that appears. Save it to the Desktop so that you can find it later.

    Some older web sites use Flash to play sounds, and they might provide a download button.

    Don’t bother downloading files in Windows Media (.wma) or RealAudio (.ram) format. We can’t easily convert those into a form that Reason likes. Wave (.wav) and AIFF (.aif), are best; some compressed file (e.g., MP3 and AAC) files will work also.

    DO THIS: Obtain at least two sound files.

OPTIONAL: Edit Your Sounds

  1. If your sound files need to be trimmed to remove silence at the beginning, or you need to extract sound from a file, launch Audacity. Audacity is a sound editor. It displays a waveform for a sound file, lets you edit it, and lets you convert between sound file formats.
    1. Open one of your sound files in Audacity, by using the File > Open command, or by dragging the sound file icon onto the Audacity icon in the Dock.

      Don’t double-click the file; that opens it in iTunes.

    2. Drag across the waveform display to select portions of audio that interest you. Press the space bar to play a selection.
    3. Use the Edit > Remove Special > Trim Audio command to remove all audio outside of the selected region. Another way to erase audio is to make a selection and press the delete key.

      NOTE: Please keep your files fairly short — say, less than 10 seconds.

    4. Use the File > Export command to save the file. Use a different name, so that you don’t overwrite your original file. Use WAV format, as Reason seems to like that best.

Load a Sound into the Sampler

  1. Create a new Reason song file with one NN-19 device.
  2. Begin with an Init Patch for NN-19: right-click anywhere on NN-19, and choose Edit > Reset Device. This gets rid of any samples, so you won’t hear anything now if you play the keyboard.
  3. Drag one of your files from the Desktop onto the keyboard display in the NN-19.

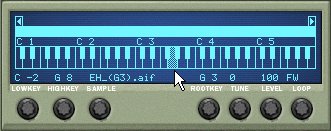
    Reason creates a key map — an arrangement of samples across the keyboard. Since you’ve opened only one file, your key map has just one key zone — a range of keys to which a sample is assigned. This key zone spans the entire keyboard (MIDI note numbers 0 through 127). Play the keyboard to hear your sample.

    When you play middle C, the sample plays back at its original pitch. When you play other notes, the sampler transposes the sample. The key that plays the sample at its original pitch is called the root key. This key is shaded on the keyboard display in NN-19. You can change the root key by command-clicking on a different key or by turning the Root Key knob just below the keyboard.

    Setting the NN-19 sampler root key for a sample

    Note that the kind of transposition normally used in samplers does not preserve the duration of a sample. For example, when you transpose down an octave, the sample lasts twice as long (just like in a variable-speed tape recorder). This has implications for the tempo of drum pattern samples.

Control Sample Looping

  1. When a sampler plays a sound that sustains, like a flute, it’s not playing a sample that lasts as long as the note. Instead, a portion of the sample following the attack loops repeatedly until the note ends. The goal is to make this looping sound as seamless as possible, and it’s often very difficult to do well. You need a sound editor that provides good loop-editing facilities.

    Drum loops, on the other hand are relatively easy to make, as long as you trim the sound file carefully in a sound editor. You want to make the sound last a whole number of beats. For example, if you have about five beats worth of drumming, you might trim the sound file so that it ends right before the beginning of the fifth beat. The sound editor doesn’t know about the beats: use your ears.

    Even if your sample is not a drum pattern, try turning on looping. Spin the Loop knob beneath the keyboard display until it reads FW, indicating a forward loop. Unless your sound file contains loop points, the entire sample will loop. You don’t have to leave the loop on if you don’t like it.

Make a Multi-sampled Keymap

  1. Right-click anywhere on the NN-19, and choose the Split Key Zone command from the menu that appears. This divides the keyboard in half, creating a new key zone above the existing one.

    Splitting a key zone in the NN-19 sampler

    You can change the boundary between key zones by dragging the handle in the key zone strip. The handle separates the zones.

    The new key zone does not yet contain a sample. This key zone should be selected already. (The right-most portion of the key zone strip should be a lighter shade of blue, as in the picture above.) If you deselected the key zone by accident, select it again by clicking in the key zone strip above the right half of the keyboard.

    Click the Browse Sample button, and load your other sample into the new key zone. Adjust the root key and loop parameters as before. For each key zone you create, make sure the root key is within that key zone, not within another key zone.

    You can adjust the tuning and loudness of each key zone. Select the key zone, and fiddle with the Tune and Level knobs.

    You’ll notice that the NN-19 has many of the same synthesizer parameters as SubTractor. One that’s different is Sample Start. Normally when NN-19 plays, it starts at the beginning of a sample. Turning up the Sample Start knob moves the starting point further into the sample. Since many sounds have a brief, noisy attack, moving the sample starting point past the attack can make the sample sound less aggressive and punchy.

    DO THIS: Create a multi-sampled patch using at least two samples, mapped to the keyboard in any way you like. Make sure that the root key for each sample lies within the key zone for that sample. Command-click a key on the keyboard to set the root key. Adjust any of the other parameters to your taste.

Embed Sound Files into the Song File

  1. At the moment, Reason refers to your sound files when it plays notes that use them in the sampler. Unfortunately, when you move your files around, Reason often loses track of where they are. (It can’t be expected to know where you moved the sound files.)

    But you can tell Reason to copy the sound files into your song file. That way, Reason will not lose these files.

    DO THIS: Choose File > Song Self-Contain Settings. Click the check boxes next to your sound files, and press the OK button. Then save your song file. Now the samples will be included in that file.

Prepare Your Part 3 Submission

  • Save your patch settings as part of a Reason song file named “part 3” (File > Save).
  • Be sure to use the Song Self-Contain Settings command to embed your sound files into the song file.
  • Please do not submit your sound files! Submit only your Reason song file.
  • CAUTION! If you load a factory patch or bank before saving your file, then all the careful changes you made to the Init Patch will disappear!