Assignment 3, Part 4

Pattern Sequencing

The earliest analog synthesizers required you to connect different modules — oscillators, envelope generators, LFOs, filters — using patch cords. (Looking at a Moog modular synthesizer will give you an appreciation of the patch cord “spaghetti” that resulted.) Some of the patch cords carried audio signals, such as the ones connecting the outputs of oscillators to the inputs of filters. Other cords carried control voltage signals. These signals were not meant to be heard; rather, they were used to control parameters like oscillator frequency or filter cutoff.

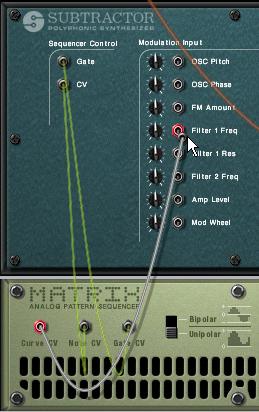
Reason preserves some of this way of doing things, with its audio patch cords and flexible modulation features. Sections within a synthesizer — like the LFO section in SubTractor — can control another section within the same synthesizer. And, of course, patch cords route audio signals between devices. But Reason takes the analogy to analog synthesizers further by providing various CV (control voltage) connections on the back of the rack. A CV connection lets one device control some aspect of another device.

Some analog synthesizers had step sequencers, which generated a repetitive sequence of control voltages, some with as many as 256 steps. Each step stored a voltage that the user could adjust with a knob. The steps were of equal duration, and the user could change the tempo. At each step, the sequencer would emit the stored control voltage, which could be routed to control most anything, such as oscillator frequency, amplitude, filter parameters, etc. When the sequencer performed the last step, it would start the sequence over from the beginning. You can hear a step sequencer at work in the Pink Floyd song, “On the run,” played on an EMS Synthi AKS synthesizer.

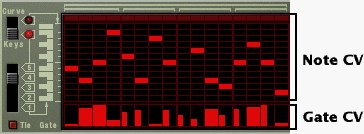
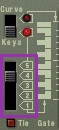
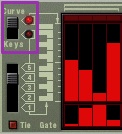
Reason has a step sequencer, called the Matrix Pattern Sequencer, which can store 32 different patterns (or sequences of steps). In this part of the assignment, we’ll learn how to control SubTractor with this sequencer. Of course, the Redrum drum machine also has a step sequencer.

Choose a Synth and Patch

  1. Make a new Reason song file with one SubTractor.
  2. Choose a patch for SubTractor from the MonoSynths folder inside the Reason Factory Sounds collection. The pattern sequencer works best with monophonic patches.

    Please choose a patch that uses the low-pass filter, and make sure it has moderate filter resonance and a pretty low filter frequency. Otherwise, the Curve CV discussed below may not do much.

    NOTE: For this assignment, we will not play the SubTractor patch from a keyboard. Instead, a Matrix step sequence will play notes on SubTractor.

Set up the Matrix Pattern Sequencer

  1. Select the SubTractor by clicking on it, and then choose Matrix Pattern Sequencer from the Create > Utilities menu.

    This automatically makes two CV connections between the Matrix and the SubTractor: one for Note CV and one for Gate CV. Note CV sends out pitches, just as if you were playing the notes on a keyboard. Gate CV triggers notes — starts their envelopes — and provides note-on velocities. You need both connections. Spin the rack around to see the connections.

    Matrix pattern sequencer run button

    Start playing by pressing the Run button on the front of Matrix. You won’t hear anything yet, because the pattern is empty.

Your First Pattern

  1. Setting number of steps and note value in Matrix pattern sequencer

    To create a pattern, choose the number of steps you want and the note value (resolution) of the steps.

    Then click in the main part of the window, the pattern grid, to set the values for each step. There are two sections of the grid: the upper one sets pitch (Note CV), and the lower one sets velocity (Gate CV). For a given step, you must have a non-zero velocity value, or else you won’t hear a note for that step.

    Matrix pattern sequencer grid of notes and velocities

    The easiest way to get started is to ask Matrix to create a random pattern. Right-click anywhere on Matrix, and choose Randomize Pattern from the menu that appears. You can do this repeatedly until you get something you like. Also, try the Alter Pattern command. Then try editing the individual step values.

    Some fine points...

    • Matrix pattern seqeuncer vertical note grid scroll

      You can see only one octave of the Note CV pitches at a time. Use the 5-position switch next to the keyboard image to change octaves.

    • To create tied notes, hold down the shift key when clicking in the velocity grid. For a monophonic SubTractor patch, the attack of a tied note will come before the previous note has been released, so that you get the legato behavior described in Part 2.

Create and Store Three Patterns

  1. You can store multiple patterns, and these patterns can have different lengths. Just use the A-D buttons in conjunction with the 1-8 buttons to select a storage location before creating or editing a pattern. There are 32 locations: A1...A8, B1...B8, C1...C8 and D1...D8.

    Change patterns when playing by pressing those buttons. Patterns change only at pattern boundaries. For example, if you’re playing pattern A1 and switch to B3 while A1 is still playing, A1 will finish before B3 starts.

    This all works exactly like Redrum.

    DO THIS: Create at least 3 patterns with different note content and number of steps. Store them in locations A1, A2, and A3. Use a monophonic patch in SubTractor — one that has a low-pass filter with non-zero resonance.

Use Control Voltage to Modulate the Filter

  1. Matrix provides another kind of CV output: Curve CV. You can use this to control, for example, filter cutoff frequency. The pattern you create will play along with the note pattern, causing the filter to change with each note. Here’s how to configure Matrix to control SubTractor’s filter.
    1. Flip the rack around (press tab key), and make a connection from the Matrix Curve CV output to the SubTractor Filter 1 Freq modulation input.

      Connecting control voltage curve data from Matrix pattern sequencer to SubTractor

    2. Matrix pattern sequencer Curve CV editor

      Flip the rack around to the front again, and click the Curve/Keys switch.

      This changes Matrix from Keys mode to Curve mode. Now dragging across the upper section of the pattern grid creates the Curve CV that will control the filter. (The lower section still shows the velocity values.) The higher the value of a bar in the pattern, the higher the filter cutoff frequency.

    3. You may need to tweak the SubTractor filter parameters to make the Curve CV audible. Use a low-pass filter. Lower the cutoff frequency, so that the CV values will be able to raise the frequency. Boosting the filter resonance will make the effect more dramatic.

    DO THIS: Create a Curve CV pattern for each of your 3 note patterns, stored in A1, A2, and A3. Use this to control the cutoff frequency of SubTractor.

Insert Pattern Automation in the Main Sequencer

  1. You can create Matrix pattern automation in the Reason Sequencer, just as you did for Redrum.

    DO THIS: Create pattern Matrix pattern automation that includes all three of your patterns (A1, A2, and A3).