Exercise A

Getting Started with Reason

When MIDI instruments first were made (long ago, in the 1980’s), they were actual hardware instruments that made sounds. The new thing about them was that they could communicate with each other, and with the computer.

In recent years, MIDI virtual instruments — software applications that emulate actual MIDI instruments — have become popular. So instead of having a big, expensive box that makes sound, you can buy a less expensive program to run on your computer. MIDI systems have become both cheaper and more portable.

Reason is a software synthesizer and sampler that runs on both Macintosh and Windows systems. However, Reason is more than a virtual instrument: in addition to sound-making capabilities, it includes a full-featured sequencer, and it lets you work with audio tracks as well as MIDI tracks.

In our classroom, we use the Korg Triton Le as a MIDI master keyboard: when you press a key on the Triton, it sends a MIDI message to Reason, and that causes Reason to play a sound. So the sounds you hear are produced by Reason — they come from the computer’s audio output jack, not from the keyboard.

In this exercise we explore making sounds with Reason. You’ll experiment with several techniques special to playing an electronic keyboard.

NOTE: You will just be exploring sounds and writing about them. You do NOT need to record any tracks!

Goals of This Exercise

  • Learn how to make a rack of sound-making devices (instruments) in Reason.
  • Experiment with playing Reason devices using the Korg Triton Le MIDI keyboard.
  • Learn about different types of electronic sounds.
  • Learn to use Reason’s Help manual.
  • Find some sounds that you like and will want to use in your sequences, later on in the course.

What You’ll Turn In

  • A Reason “song” file, which saves your rack configuration. You do not have to record any tracks!
  • A text description of three sounds you explored (see details below). These sounds should be visible in the rack.
  • Follow the submission instructions at the bottom of this page.

Preliminary Setup

  1. Make sure the button on the front of the Fastlane MIDI interface is in the out position. Pushing the button repeatedly toggles its position between in and out. (The Fastlane is now hidden away on most stations, so you probably won’t be able to find it.)
  2. Set the Korg Triton Le so that the PROG button to the left of the display is on.
  3. Plug your headphones into the white cable on your desk.

Putting Together a Reason Rack

Reason contains many different types of device: synthesizers, samplers, drum machines, effects units, pattern generators.

You will set up a rack of three different melodic or chordal instrument devices drawn from: SubTractor, Malström, Thor, NN19, or NN-XT, in any combination. Please do not use drum instruments for this exercise (i.e., not Kong, Redrum, or Dr. Octo Rex) or the ID8, a simple instrument that will be too limiting.

  1. Launch Reason. You will see a choice of authentication methods. Click the Multi License button. After Reason finishes loading, you will see an empty document. Note the four main sections: Mixer, Rack, Sequencer, and the Browser on the left.
  2. Drag the SubTractor Analog Synthesizer from the Browser into the Rack. Note that the Browser window has changed to show SubTractor patches.
  3. Play a note on the Korg Triton Le keyboard; you should hear a bass sound.

    If you don’t hear anything, check the following settings.

    • In the Reason sequencer at the bottom of the window, the track called “Bass Guitar” has an instrument icon just under the track name. This icon should have a gray arrow on it. If it doesn’t, click the icon. The gray arrow means that SubTractor is selected for MIDI input, and so you hear that device when you play on the keyboard.
    • The Mac audio output should be turned up and not muted. To check this, look for the speaker icon in the right part of the menu bar. Click this icon and drag the slider all the way up.
    • Make sure your headphones are plugged into the white (or sometimes black) extension audio cable, not into the Korg. We want to hear the computer, not the Korg!
  4. Choose a SubTractor sound to play.

    1. In the right part of the Browser window, double-click any of the .zyp patch files there, or open one of the category folders to find many more patches. SubTractor now displays that patch name, and will play that sound.
    2. Use the up and down buttons (on your computer keyboard, in the Reason browser, or next to the patch name on the SubTractor instrument) to select other patches in the same folder.

Try Some Playing Techniques

  1. Experiment with velocity sensitivity.
    1. Patch to load: Monosynths folder > Matrix3.zyp
    2. Explanation: Each synthesizer key has a sensor underneath it that registers how quickly the key travels when it is pressed. When you press a key forcefully, it travels quickly; when you press softly and carefully, it travels more slowly. Velocity sensitivity (sometimes called “note-on velocity”) means that a synthesizer patch is programmed to respond to key velocity changes: the patch will sound different if you play softly than it will if you play forcefully.

      Try it and listen for the changes in sound: first play softly, then play the same note forcefully. Nearly all synthesizer patches will respond to key velocity. Usually, greater velocity makes a louder sound, but there are other aspects of the sound that can change, typically tone color. Try to figure out what varies with velocity.

    3. The Monosynths folder holds patches that play a single sound at a time. These patches are often used for playing solos or melodies.
  2. Experiment with aftertouch.
    1. Patch to load: there are several in the Monosynths folder: LeadSwell, 70s Synth Lead, Duophonia, HarshLead, SF Lead
    2. Explanation: The term “aftertouch” means what it sounds like it should mean: it refers to what happens after you press a key. Try this: press a key on the Triton keyboard, and keep it held down. Continue to press down, but now press more forcefully, deeper into the key. A sensor underneath the key registers the changes in key pressure. Some Reason patches, but not all, respond to aftertouch.
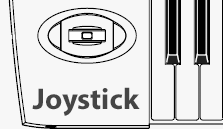
  3. Korg Triton joystick

    Experiment with the joystick, found to the left of the keyboard. Please treat the joystick with care! The joystick is spring-loaded — it snaps back to the middle position when you let go.

    1. Patch to load: Monosynths folder > Wheel Wah Lead
    2. Explanation: The joystick on the Triton keyboard combines several functions in one physical control:
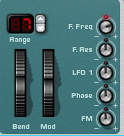
      • Bend wheel in Reason's SubTractor instrument

        Pitch Bend: Play a note and, while holding the key down, move the joystick right and left. The pitch rises and falls. Notice also that the Bend wheel in SubTractor goes up and down. It’s controlled by the joystick’s horizontal motion.

      • Mod Wheel: Play another note and, while holding the key down, move the joystick up. Listen for a change in the sound quality. Notice also that the Mod Wheel in SubTractor goes up, because it’s controlled by the joystick’s vertical motion.
  4. Experiment with amplitude envelopes.
    1. Patch to load: Pads folder > Dreamy FM Pad
    2. Explanation: From Reason’s Help menu, choose Reason Help. From the Contents list on the left, choose SubTractor Synthesizer. Then choose the Envelopes - General section.

      Read the opening paragraph with the envelope diagram, and the descriptions of Attack, Decay, Sustain, and Release. Then read the Amplitude Envelope section only. (You don’t need to read the Filter Envelope or Mod Envelope sections now.)

    3. Now play a few notes using the Dreamy FM Pad patch. Find the Amplitude Envelope section, and notice that the Attack and Release values are fairly high (75 and 78). One at a time, drag the Attack and Release faders down so they have very low values, and listen to how the sound changes when you play notes again.
    4. The Pads folder includes patches that sound best when playing long slow notes. Typically they fade in and fade out gently, and several notes can be played at once. These patches are often used to provide a backdrop for other sounds.
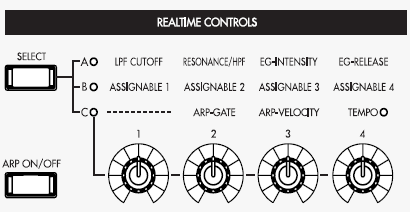
  5. Experiment with the real-time control knobs. These four knobs on the Triton let you control various aspects of the sound while you play.

    Korg Triton realtime control knobs

    The function of the knobs depends on the controller mode: A, B, C. Change mode by pressing the SELECT button. Mode A lets you adjust a few common settings, mostly having to do with the filter, which changes tone quality. In mode B, the function of a knob depends on the particular program. Don’t be surprised if a knob doesn’t seem to be doing anything.

    Fiddle around with the knobs while you play to see if you can make interesting changes to the sound.

Try Effects and Other Instruments

  1. Get ready to add a second instrument device: on the left panel of the Browser, choose Instruments. Drag the NN-XT Advanced Sampler to the Rack.
  2. As you did with SubTractor, use the Browser to select a patch to play. Choose Brass folder > Soprano Sax.sxt, double-click to load that patch, and play a few notes.

    Does this sound like a real saxophone? It might, or it might not, partly depending on how you play. Experiment with playing the keyboard in a way that makes it not sound like a sax. How you play is important! Try playing notes in the low register (left end of the keyboard), the middle register, and the high register (right end of the keyboard). Play notes with a variety of lengths: some short, some long.

  3. Let’s add some reverberation to the sax sound. Here’s how:
    1. Click anywhere on your NN-XT device to select it. The device in the rack now has a blue outline.
    2. In the left panel of the Browser, choose Effects. Locate the RV-7 Digital Reverb, and drag it into the rack just below the NN-XT.
    3. Play a few notes, and listen to how the sound has changed. The default effects patch is called Hall; use the up and down arrows to select MediumRoom instead. Play again. The reverb effect should sound less extreme now.
    4. Press the TAB key on your computer keyboard. The rack swivels around to show you the connections at the back. When you create the NN-XT device, Reason also creates a channel for it in the Main Mixer and wires things up correctly. (Later, when building complex racks, you may want to change the way devices are connected by manipulating the patch cords in the back of the rack.)
    5. Notice that the 1/L and 2/R Audio Outputs of the NN-XT are patched to the Inputs on the RV-7, and that the outputs of the RV-7 go up to the Mix. This means that the entire sound of the sampler goes into the effects device.

      This is called an insert effect, since you’re inserting the effect between an instrument and the mixer. (If Reason didn’t patch this correctly, it’s because you didn’t select the NN-XT before creating the effect device.)

    6. Press the TAB key again to return to the front of the rack.
    7. Fiddle with the RV-7 effect controls. You might want to adjust the DRY/WET mix so that you can hear some of the dry NN-XT sound mixed in with the “effected” sound. Finally, try the three different positions of the bypass switch on the RV-7, and note what happens to the sound.
  4. When you’re hunting for patches to use in your music, you often don’t care about devices. Instead, you want a specific type of sound, such as a bass or a guitar, no matter which device produces it.

    To search for a type of sound that might be available from any of the synthesizers and samplers, do this:

    1. Click on the Reason Sounds folder in the Browser, and then explore patches in the various instrumental categories.
    2. If the Browse Patch area of a device is colored in orange, then double-clicking a patch name in the Browser will load that patch into the device. Or, if the patch requires a different type of device, the old device will be replaced with this different one.

Complete Your Exercise A

  1. Close the Reason file you were working with, open a new Reason file, and begin a new rack.
    1. The rack should have three sound-making devices, drawn from the following melodic or chordal instruments: SubTractor, Malström, Thor, NN19, or NN-XT, in any combination.

      Please do not use drum instruments for this exercise (i.e., not Kong, Redrum, or Dr. Octo Rex), and do not use the ID8.

    2. The rack should have at least one insert effect: RV7000 MkII Reverb, The Echo, and UN-16 Unison are good choices.
    3. Choose three sounds that you like (i.e., one for each device). Be sure the devices in your rack are set to these three sounds.
    4. You do not have to record any tracks!
    5. Save your rack as a Reason “song” file (File > Save).
  2. In your text description, list the device and name for each sound you include in the rack. Then, for each sound, write a paragraph that tells:
    • how you played the sound (what register? loud or soft? fast or slow, held notes? etc.), and
    • what the audible result was. That is, try to describe the sound. Be as specific and detailed as you can. Include some description of the sound’s amplitude envelope.
    • Identify any interesting effects caused by changes in velocity, aftertouch, the joystick, and the realtime control knobs.

    NOTE: How long should your paragraph be? It should be no shorter than a half page of double-spaced text, roughly. It will take several sentences to describe a sound in detail, and how you played it. If you don’t write enough, we will ask you to elaborate and re-submit your description.

  3. Follow the assignment submission instructions to submit your exercise using Canvas. Write your text description in a plain text (.txt), RTF (.rtf), or Word (.doc, .docx) file, and submit this along with your Reason song file.