Using Block Mode

Reason: Using Block Mode in the Sequencer

The Block Mode feature in Reason lets you organize your music in blocks, which can consist of anything — a few measures, a phrase, a verse, a chorus. You can move and copy blocks within the Blocks track in the Sequencer, and you can still have tracks that play independently of the blocks. The point is to give you a higher-level way of quickly working with the arrangement of a whole song.

There are several different elements of Reason that come together to make blocks work.

Block Mode controls in the Reason sequencer

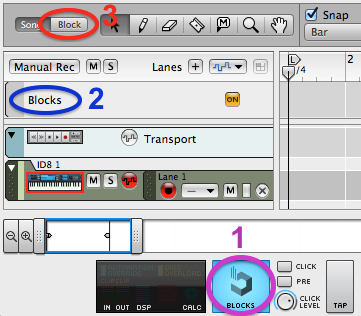
  • The BLOCKS button, circled in purple above (1), controls whether Block Mode is available. It is on (blue) by default. If you turn this button off after creating some blocks, your blocks will not play or be visible. (They aren’t gone forever, though.)
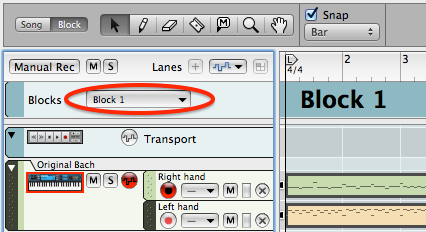
  • The Blocks track, circled in blue above (2), is where you line up blocks of music in the Sequencer timeline.
  • The Song/Block selector switch, circled in red above (3), lets you show in the Sequencer editing area either the contents of a single block or the entire song, which consists of a sequence of blocks and, optionally, tracks that play independently of the block content.

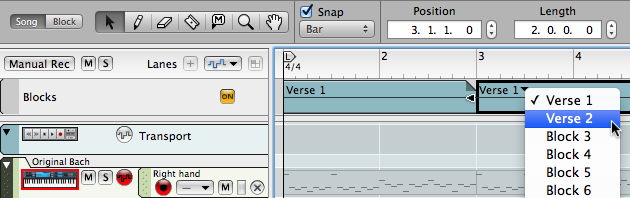
The basic idea is to create several blocks — say, a verse and a chorus — while in Block View, and then switch to Song View to arrange these.

Creating Blocks

  1. If you already have some music in the sequence that you would like to place in separate blocks, you may need to split long clips into smaller ones. If you don’t remember how to do that, review this page, where the text mentions the razor tool.
  2. Select the clips you want to place into a block (using shift-click to select multiple clips), then issue the Edit > Cut command).
  3. Switch to Block Mode using the button circled in red above.
  4. The Blocks track shows “Block 1” in large print. Double-click this text to rename your block something descriptive, such as “Verse 1.”
  5. Set the Position Pointer to the beginning of the sequence, and paste your clips.
  6. Add more music to the block if you wish, via recording, pasting more clips, or using the familiar sequence-editing techniques.
  7. End locator icon in the Reason sequencer time ruler

    Drag the End locator (in the sequence time ruler) to indicate the duration of the block.

  8. Notice that when you are in Block mode, there is a popup menu in the Blocks track.

    Popup menu of blocks when in Block Mode in the Reason sequencer

    Use this menu to switch between your blocks. You can edit only one block at a time, but you can copy and paste clips between them.

Arranging Blocks

Once you have some blocks, arrange them in Song View.

  1. Press the Song button in the upper left corner of the Sequencer.
  2. Using the pencil tool, draw some clips into the Blocks track.
  3. Each clip will have the name of the first block. Select a block clip, and then click on its name to get a menu of other blocks.

    Changing the block refered to by a block clip in the Reason sequencer

    You can see a faint outline of the clips and notes contained in the tracks that comprise a block. But to edit this material, you have to go back to Block View.

    As a quick way to edit the material in a block, you can double-click a block clip to enter Block View for that block.

  4. The durations of your clips do not have to correspond exactly to the durations of the blocks that you set in Block View. If a clip is shorter than a block, then you’ll hear only part of the block. If the clip is longer, then the block will repeat as necessary to fill the time of the clip. Vertical bars appear in such a clip to show where the block repeats.

    If you drag the left edge of a block clip, it will cut off the beginning of the block.

  5. You can add material to the sequence displayed in Song View, and this material plays along with the blocks. This is a great way to have a melodic line or percussive elements that span the boundary between two clips. It’s probably best to put this material into lanes that are not present in the blocks.

    To suppress temporarily the playback of blocks while you work on material that is not in a block, click the orange ON button in the Blocks track.

Get creative with this feature! For example, you can alternate rapidly between segments of different blocks just by resizing the block clips.