

Note clips let you work with groups of notes in the Reason Sequencer in a way that encourages you to build up larger phrases and sections of music from smaller components.
Reason: Note Clips in the Sequencer
Fundamental Clip Techniques
Here are some instructions and tips for working with clips in the Sequencer.
-
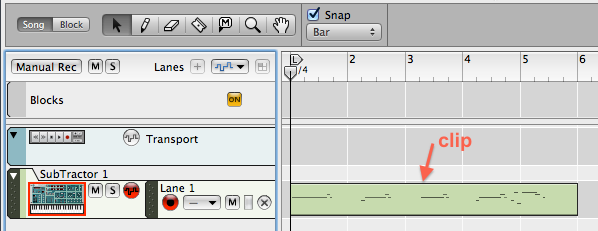
After you record an Instrument Track, it looks like this in the Sequencer.
The green box is the clip that contains the notes you recorded.
By enclosing notes in clips, Reason lets you move, copy, and transform groups of notes in one quick operation.
- Using the arrow tool ('q' key), drag a clip to move
it to a new position in the note lane, or into a
different lane, even one on a different track.
(This operation, as well as most of the others on this page, can be done with multiple clips, as well as single clips. You just have to select the clips first by shift-clicking on each of them, or by clicking on an empty spot in the track and dragging a rectangle that touches each clip. Then when you, for example, drag one of the selected clips, all of them will move.)
- Drag a clip with the option (or alt) key down to make a copy of the clip.
- Use the razor tool ('r' key) to split a clip into two
clips.

Just click on a clip with the tool. Or you can drag across a clip to split it into three clips.
- To delete a clip, first select it by clicking on it with the arrow tool. Then press the delete key.
-
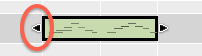
When you select a clip, you see resize handles on either end of the clip.
Drag these handles horizontally to resize the clip. If you make it bigger, there will be new empty space inside the clip, in which you can insert notes in Edit Mode with the pencil tool.

If you make the clip smaller, some of the notes in the clip may be masked: these notes will now be outside the confines of the clip, even though the notes are still there. You can tell at a glance that a clip contains masked notes, because one or both ends of the clip will have white corners.
Masked notes do not play. You can always get the masked notes back by enlarging the clip again using the handles.
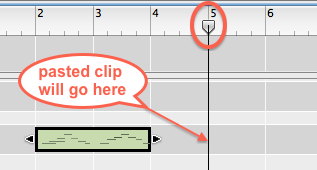
- You can copy and paste a clip into the same lane. Select one
or more clips, and use the familiar Edit > Copy
command. Before pasting, set the position pointer
(circled below, at measure 5) to the place where you
would like the pasted material to go. Then use the Edit
> Paste command.
Looping Clips
- You can use copy and paste to build up a loop.
- Start with a clip that you trim so that it contains exactly an integral number of measures (or beats, or eighth-notes, etc.).
- Copy that clip (command-c). Notice that the position pointer automatically moves to the end of the copied clip.
- Paste the clip (command-v). The position pointer moves to the end of the pasted clip, so you can keep pasting over and over to create many copies, all lined up edge-to-edge.
The repeated clips are independent. You can edit some of them to change notes so that your material does not loop literally.
Inserting and Removing Measures
Sometimes you need to add blank measures, to make room for more clips. Other times you need to get rid of empty measures.
- To add new empty measures, position the left locator
at the point where you want the empty measures to begin.
Place the right locator so as to indicate how many
empty measures to insert. (The locators are circled below.)
For example, if you want to add one empty measure, set the
locators one measure apart.
Then choose Insert Bars Between Locators from the Edit menu.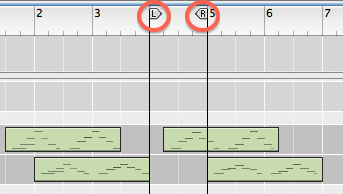
The clips to the right of the left locator move later in time by one measure.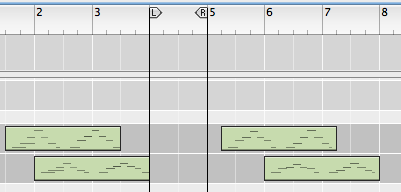
- To delete measures, position the locators at the boundaries of the measures you want to delete, then choose Remove Bars Between Locators. This deletes any portions of clips between the locators, and it moves later clips to an earlier position to close up the gap.
- Both of these commands will work with units of time smaller than a measure. But be careful, because this will affect the way that later clips in the sequence relate to the time signature. (You might inadvertently shift the later clips so that notes that used to fall on a downbeat no longer do.)
More Clip Details
Here are some more things to know about working with clips.
- Only one clip at a time can play in a lane. If you make it so that one clip overlaps another in the same lane, then the clip that begins later will override playback of the first clip.
- Combine two clips to make a new, larger one by selecting both clips (with the arrow tool) and choosing Join Clips from the Edit menu.
- If you drag a clip’s resize handle while holding down the option (alt) key, you will scale the time that the clip takes.
- Select one or more clips and press the 'p' key: this turns on loop mode, sets the left and right locators to the selected clip(s), and starts playback. Very handy for auditioning a section of music you’re working on.
-

To mute a clip without affecting other clips in the same lane, click it with the mute tool. Click it again to unmute it.
- Create a new, empty clip by dragging on a lane with the pencil tool. You can then enter Edit Mode to add notes to the clip with the pencil tool.
- To name a clip, select it with the arrow tool, and choose Add Labels to Clips from the Edit menu. This can be a good way to organize your work.
- To change the color of a clip, select it with the arrow tool, and choose Clip Color from the Edit menu. This is another way to help you organize your clips.