Send Effects

Reason: Using Send Effects

You can set up effects in two ways: as insert effects or as send effects.

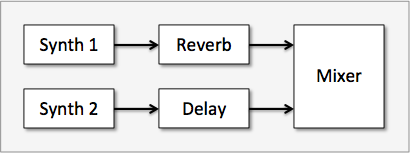
We already used one method to create insert effects in Exercise A. The idea is that multiple effects are wired in series, creating a chain where the output of one effect feeds into the input of another. Insert effects are easy to set up and are particularly good for EQs, compressors, guitar amps, and the like — any effect that you want to treat the entire signal coming from an instrument.

Signal flow of insert effects

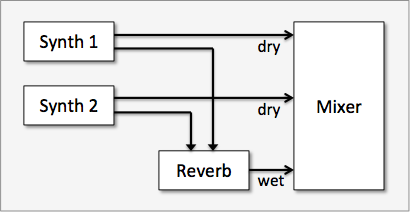
But send effects have their place, too. In a send effect, you send a copy of the signal from an instrument to an effect, in parallel with the dry, or “un-effected,” signal. There might be several effects sends, all in parallel. One advantage is that multiple instruments can share a single effect. This is a good arrangement for effects that you want to blend with the dry signal, such as reverbs and delays. It saves processor power, and it makes it easier to configure an effect: you have one set of reverb parameters, rather than a different set for every instrument.

Signal flow of a send effect

Setting up a Send Effect

You set up a send effect using the Main Mixer. Here’s how to create a reverb that is shared by multiple tracks.

  1. If you can’t see the Main Mixer, choose Window > View Main Mixer.
  2. Right-click on an empty spot anywhere in the Main Mixer, and choose Create Send FX. Then double-click the RV7000 MkII Reverb icon that is in the browser to the left of the mixer.
  3. Locate the FX RETURN portion of the Master section in the mixer. This is just to the right of the right-most channel strip.

    Scrolling the Main Mixer sections in Reason

    If you don’t see this part of the mixer, make sure that the Main Mixer FX section button is turned on, and that the blue navigator rectangle is scrolled to enclose the FX section, as in the picture to the left.

  1. Click the EDIT button circled in red in the first picture above. This directs your attention to the RV7000 device that was created in the rack.
  2. Click the Browse Patch button in the RV7000, and choose the “ALL 1st Hall” patch. This has a long reverb time, and so its presence in the mix is easier to identify when you’re just starting to work with send effects.
  3. Return to the Main Mixer, and press the 1 button in the SEND section of one or more channel strips. (This button is enclosed in a purple rectangle in the first picture above.) This tells the mixer to send a copy of the channel strip’s signal to the reverb.

    Adjust the amount of signal sent from the channel to the effect with the green LEVEL knob just to the right.

  4. If you want to get rid of a send effect, just delete the effect device in the rack.