

You can time-scale an audio clip — that is, stretch or shrink its duration — without affecting the pitch of the audio. You can do this either to a clip as a whole, or to specific parts of the clip. You can also quantize (to a note-value grid) parts of a clip that have a strong rhythmic character, just as you would for MIDI notes.
Reason: Time-scaling Audio
Time-scaling Audio in an Entire Clip
-
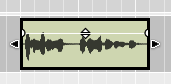
Select the clip to reveal its resize handles on either end of the clip.
While holding down the option (or alt) key, drag one of the resize handles to time-scale the clip. You will see the time-scale clock cursor, and the audio waveform will scale while you drag the handle.
- The sound quality of time-scaling is affected by a particular clip setting. Right-click on a clip, and choose one of the items in the Stretch and Transpose Type popup menu: Allround, Melody, or Vocal. For the poetry clips used in Assignment 4, Vocal produces the clearest result. You can apply this setting at any time, even after having time-scaled a clip. To affect more than one clip at a time, select multiple clips, then choose Edit > Stretch and Transpose Type.
- Note that if you change the tempo of your sequence after
having placed an audio clip, then the clip will time-scale
automatically to fit the new tempo. This is great for drum
loops and other precisely rhythmic material. However, it may
not be what you want for all sounds. To suppress this
automatic behavior, select clips that you want to exempt from
time-scaling, and choose the Edit > Disable Stretch
menu command before changing the tempo.
This works well if you want to bring in the audio file for a vocal and then find a tempo for the sequence that matches the tempo of the vocal. Import the audio file, disable stretch for its clip, and play the sequence with the metronome turned on. Change the tempo and drag the clip left and right until you find that the beats in the clip match the metronome clicks.
A Problem with Disabling Stretch
If you intend to change tempo after importing a sound file, and you plan to disable stretch for the file, so that tempo changes do not affect its speed, you could have a problem. To avoid the problem, you must not edit the left edge of the clip before you have found the final sequence tempo.
Why? Read on...
If you disable stretch for a clip that does not begin at the start of its underlying sound file, and then you change the tempo, you will find that the contents of the clip have shifted to reveal a different part of the underlying file. This will be frustrating if you have already made a lot of precise edits that are now ruined. It is possible to get back on track by using the Comp Editor, but this can be painful.
An alternative is to follow the procedure below, if you have already made a lot of edits and want to change the tempo without time-scaling the audio.
- Select all the clips, and choose Edit > Bounce > Bounce Clips to New Recordings. This detaches a clip from its underlying sound file, and you can no longer edge-edit the clip to retrieve other parts of that file.
- With all the clips still selected, choose Edit > Disable Stretch.
- Change the tempo. The clips still occupy the same amount of musical time — e.g., if a clip was two measures long, it will still be two measures long — but the audio will not time-scale to fit the new tempo.
- If you are content to move clips around and resize them to
get a result that is similar to what you had before changing
tempo, then skip this step.
Otherwise, you’ll want to scale the start times and durations of the audio clips so that your edits will sound the same at the new tempo as they did at the old tempo.
Compute a scale tempo percentage with this formula:
scale tempo percentage = (old tempo / new tempo) * 100
So if you change from 120 BPM to 60 BPM, the result is 200%.
Choose Window > Show Tool Window, and find the Scale Tempo section in that window. Be sure all the clips are selected, specify the percentage that you computed above, and press Apply.
The clips should snap into place, and they should sound the same as they did at the old tempo.
- With all the clips still selected, choose Edit > Bounce > Bounce Clips to New Recordings again. Now the clips will be tagged with the new tempo.
- If you like, with the clips still selected, choose Edit > Enable Stretch. Nothing will happen now, but if you later change the tempo by a small amount, the clips will time-scale appropriately.
Well, okay, that was painful also.
Working with Slices in an Audio Clip
Reason automatically segments audio files according to its estimation of transient peaks, or places where the audio suddenly gets louder. So in a drum loop, you would see transients for each drum hit. These segments are called slices in Reason. A slice is defined by two adjacent slice markers. You can move or delete existing markers, as well as create your own.
To see slice markers for an audio clip, double-click the clip to place it in edit mode, and press the Slice Edit button that is to the left of the Snap settings.
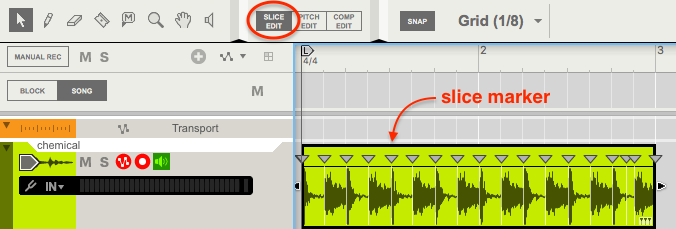
The slice markers are the triangles with descending white vertical lines, which slice through the audio waveform at transients.
There are several things you can do with slices.
- Drag a slice marker horizontally to warp the timing within
the clip.
You can select multiple slices by dragging across the clip. Then drag the gray bar at the bottom of the clip to move the slices together.
If you want to return to the original slice marker positions, choose the Edit > Revert All Slices menu command.
- Select slice markers by dragging in the clip, and then quantize them using the settings in the Quantize section of the Tool Window.
- Break a clip into individual short clips at slice marker boundaries. Select several markers by dragging across the clip, and choose the Edit > Split At Slices menu command.
- Export a sliced clip for use in the Dr. Octo Rex Loop Player device. This gives you a lot of control over the timing of the components of a loop. Export by choosing the Bounce > Bounce Clip to REX Loop menu command. For more about this, search for the Bounce Clip to REX Loop topic in the online Reason help.
Tips for Working with Slices
- To delete a slice marker, click on its triangle and press the delete key.
- To make a new slice marker, click in the clip with the pencil tool.
- To move a slice marker without warping the surrounding audio, hold the option (or alt) key down while dragging the marker.