Filters and EQ

Filters and EQ

Earlier this semester, we studied some basic acoustics concepts — for example, that single complex sounds actually are made up of many different frequencies. These frequencies are called the spectrum of that sound (see Acoustics 1 app and Acoustics 2 app). A sound’s particular time-varying spectrum determines its tone quality and sound color. Generally speaking, a brighter, harsher sound includes more high frequencies, while a more mellow sound has fewer high frequencies.

We experimented with different methods that alter a SubTractor patch’s spectrum:

  • When we studied MIDI control change messages (see MIDI app, page 4), we learned that control change message #74, the brightness controller, adjusts SubTractor’s Filter 1 cutoff frequency (labeled “F. Freq” in SubTractor). (If your Korg Triton Real-Time knobs are set to A mode, moving the first knob will send control change message #74.)
  • Assignment 3, Part 1, introduced the different types of filters available in SubTractor (low-pass, high-pass, band-pass, and notch) and showed how to use the mod. wheel to adjust the filter cutoff frequency.
  • When we studied modulation, we learned that “wah-wah” is a cyclical change in timbre that can be applied using an LFO (see Modulation app, page 4). Set the LFO to modulate F. Freq, the filter cutoff frequency.
  • In Assignment 3, Part 4, (Pattern Sequencing), we used a Matrix CV connection to control SubTractor’s Filter 1 cutoff frequency over the course of the pattern.

Why to Apply Filters and EQ

When composing or arranging electronic music, it’s often helpful to alter the frequency spectrum of a sound or track. There are many reasons to do this:

  • You’ve found a factory patch that you like, but its sound is too bright, or too mellow.
  • A track might sound fine on its own, but when played together with other tracks, it sounds too harsh (so it overwhelms other tracks) or too mellow (so that it’s hard to hear).
  • If two different patches are playing the same notes (called doubling), it can be good if they blend together better. Altering the spectrum of one or both can help them blend better.
  • You might decide that a section of your project should sound more edgy or, conversely, warmer. This can be a way to add needed contrast to your project.

Types of EQ in Reason’s Main Mixer

EQ section in a channel strip of the Reason Main Mixer

There are several standard EQ types, and these are built into the Reason Main Mixer, in the EQ section. These are all called parametric EQs, because you can change the cutoff or center frequency parameter of the filters, among other parameters. There are knobs to control the parameters, but it is more instructive to manipulate the parameters directly on a filter frequency 
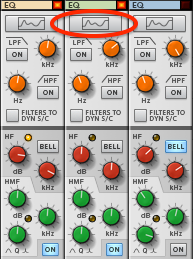
response graph in the Spectrum EQ window. To see this window, press the button, in the mixer EQ section, circled in red below.

What you see is a graph of frequency, on the horizontal axis, and the amount of cut or boost that the EQ performs on the input sound, shown in dB on the vertical axis. If the Analyzer box is checked, you will see a real-time 2D spectrogram displayed “behind” the filter graph, showing the effect on the spectrum of any EQ that is active.

Here is a brief description of the standard EQ types.

  • Low-pass — lets the low frequencies pass through without change. Higher frequencies are “rolled off,” or reduced in strength, in a way that is gradual as you go up the frequency spectrum. The transition begins at the filter cutoff frequency. You change this frequency by dragging the orange circular handle left and right.

    Low-pass EQ interactive frequency response graph

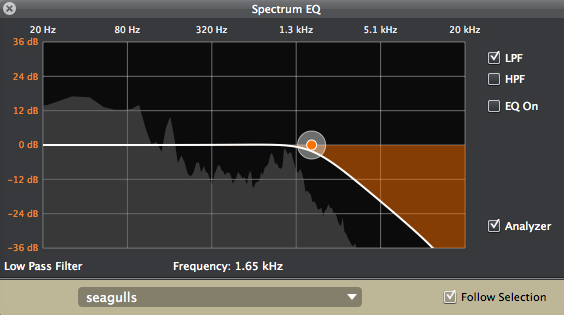
    Note that you must check the LPF (low-pass filter) box to see and change the filter.

  • High-pass — lets the high frequencies pass without change.

    High-pass EQ interactive frequency response graph

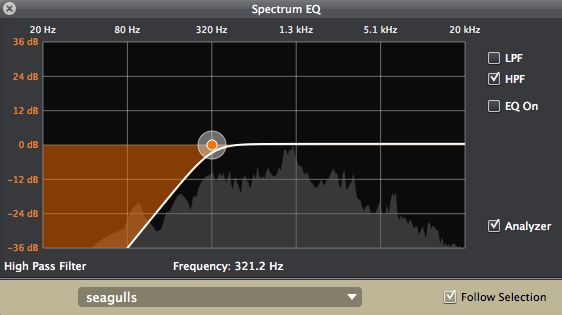
    Notice that you can have the LPF and HPF active at the same time. The result is the intersection of the two filter shapes.

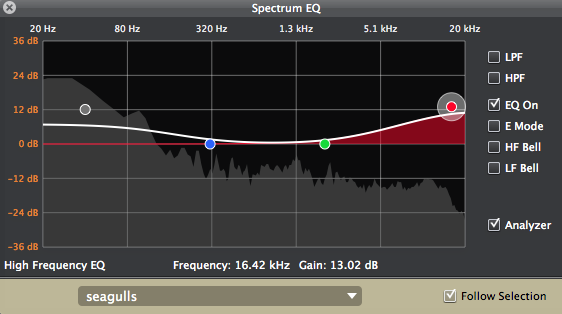
  • Low-shelf and high-shelf ‐ filters that let you boost, as well as cut, the strength of frequencies on either end of the spectrum. To enable these filters, first turn off both the LPF and HPF EQs, so that they won’t distract you. Then check the EQ On box. You will see four filter handles. The outer two let you change the low-shelf (gray) and high-shelf (red) cutoff frequencies. Drag up and down to change the gain of an EQ: how much it cuts or boosts the incoming signal.

    Interactive frequency response graph for combined low-shelf and high-shelf EQs

  • Peak/Notch — lets you boost (peak) or cut (notch) an area of the spectrum using a bell-curve shape. The narrower this shape, the more selective is the filter. A narrow shape has narrow bandwidth. In many EQs, the bandwidth is controlled by a Q knob. (“Q” stands for “quality,” or the degree of selectivity of the filter. Higher Q corresponds to narrower bandwidth.)

    To enable the peak/notch EQs, check the EQ On box. If you already have low-shelf or high-shelf EQ settings that are not flat (that is, a gain of zero), then command-click their handles to set their gains to zero. Now you can see the effect of the peak/notch EQs more easily.

    Interactive frequency response graph for combined peak and notch EQs

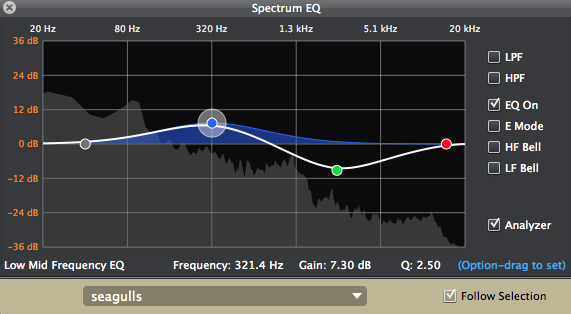
    To change the Q, or width of the peak or notch shape, option-drag the blue or green handles, dragging horizontally or vertically.

    To get a more narrow bell-curve shape, check the E Mode box. This sets a constant Q that does not depend on the gain of the filter. But the main thing is that this lets you make the bell curve narrower.

    Check the HF Bell or LF Bell boxes to turn the shelf EQs into peak/notch EQs, albeit without adjustable Q.

Notice that as you manipulate the controls on the Spectrum EQ graph, the EQ knobs and switches in the Main Mixer channel strip change accordingly.

Other EQs in Reason

There are other parametric EQs available in Reason: the standalone PEQ-2 Two Band Parametric EQ and the MClass Equalizer. Given what you know about the EQs in the Main Mixer, you should be able to figure out these devices.

There is also a graphic EQ built into the BV512 Digital Vocoder. A graphic EQ gives you a number of fixed frequency bands spread across the spectrum, using equal musical intervals, such as octaves or major thirds. You can boost or cut each band. To get the graphic EQ behavior from the BV512, set the Equalizer/Vocoder knob to Equalizer, and select the number of bands using the knob above. The Shift knob to the right of the display shifts all the frequency bands lower or higher by an octave.

Reason Vocoder device in graphic equalizer mode